If you do not need
to recover any of
your missing files,
click here for the instructions.
To know
The
complete story
about this trouble and where
exactly are your missing files,
click here.
You will find there useful
information to avoid this
same
trouble with your other
software.
Procedure to fix the
trouble and to recuperate
your missing files
Step 1 of 8 : Get the
appropriate privileges to be
able to make the clean up
If you are using a computer
with multiple user accounts on it, you must log with the account that
has the administrator privileges. If your computer never ask you
for a log name and password, you are probably using a computer with only
one account with the administrator
privileges already enabled.
Step 2 of 8
: Set the Folder Options to be able to access the users' profile folders
For more fun and longer pleasure,
Windows 7 (and
Vista) has decided to
make it harder to find the Folder Options
window than it was in previous versions. Here are the steps...
1- Click on the Start menu button
in the task bar (normally at bottom left).
2- Select the Control Panel menu.
3- When the control panel opens you can be either in
Classic View or
Control Panel Home view:
If you are in the Classic View
continue with the following steps:
3a- Double-click on the Folder Options
icon.
3b- Click on the View tab.
3c- Go to step 4.
If you are in the Control Panel Home
view continue with the following seps:
3a- Click on the Appearance and Personalization
link.
3b- Click on Show Hidden Files or Folders.
3c- Go to step 4.
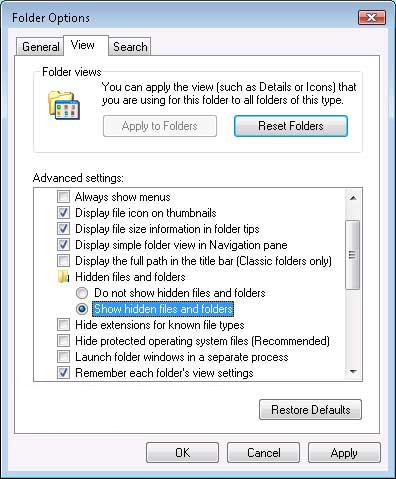
4- Under the Hidden files and folders
section, select the radio button named Show
hidden files and folders.
5- Unselect the check box named Hide extensions
for known file types.
6 -Unselect the
check box named
Hide protected operating system files
and accept the warning message.
Once this is done, your
Folder Options
window should look like the following image.
7- Select the
OK button.
From now,
Windows 7 (or
Vista) is configured to show you all the hidden
files. Once you will be done with the clean up, you can come back
here and set those options back to their previous values.
Step
3 of 8 : Moving your existing DecoTech folder to its new
default location
1- Run the
Windows Explorer application.
You can find its shortcut in Start ->
All Programs -> Accessories.
2- Locate your C: local hard disk in the
left pane and select it. You should see its contents in the right
pane.
3- Create a folder name "DDS Inc" directly
in your "C:\".
4- Make a copy of your "DecoTech\" folder,
normally installed in the "C:\Program Files\"
or "C:\Program Files x86" folder,
and paste it in the "C:\DDS Inc\"
folder.
Once the copy is completed
you should see a
"DecoTech\" folder in
the
"C:\DDS Inc\"
folder.
Step 4 of 8 : Get the DecoTech version 6.11 installation
application
You cannot install a DecoTech
version 6.08 (or lower) on Windows 7 or
Vista and simply update it to
version 6.11 (or higher). That will not fix
anything and the trouble
will stay there. To
definitely fix the trouble you must do a fresh new
installation by running a DecoTech installation application version
6.11
(or higher).
If you do not have in hands a DecoTech version 6.11
(or higher) Master
CD-Rom, then look for
the appropriated link,
based on your serial number, directly
at the bottom of the
main
Tech Support webpage.
Take the time to read the
information on the
downloading webpage but
do not run
immediately the downloaded
file. Save it
somewhere you can easily
find it, and come back here
for the next step.
Step 5 of 8 : Install the DecoTech version 6.11 as an update
1- Run the application you have downloaded in step #4. Select
OK.
Select Unzip. Select
OK.
2- Follow the usual installation instructions and enter your version
6.xx
serial number and
numerical key.
3- You will see the
Welcome window,
the
License Agreement
window and the
Installation type
window. In that last
window be sure to select the
check box named
UPDATE programs only.
4- In the
Choose DecoTech destination
folder window,
be sure that the
Main folder of DecoTech
is set to "C:\DDS Inc\DecoTech\".
5- Continue the installation
as usual. If you are
asked to install extra
libraries of items, image
sample files or animation
sample files, you can skip
them since they were already
installed.
6- When the installation is
complete, you can unselect
the check box that will run
the
Scene Editor
application automatically,
otherwise you will have to
close it anyway.
Step 6 of 8 : Get familiar with the DecoTech Main
Folders Merger Utility
application
Take the time to read the
information about this
application, then come back
here for the next step.
This application is explained in the
Topic #16 in
the
Tips Spot sub-section.
Step 7 of 8 : Merging the DecoTech ghost
folders with the DecoTech
main folder
Each
person who logs in Windows
with a specific log name and
password, automatically uses
a specific user account that
has its own profile folder
located in "C:\Users\".
You will need to look in
each of those
<username>
folders to see if a
DecoTech ghost folder
is present. For each
DecoTech ghost folders
found, you will need to use
the
DecoTech Main Folders Merger
Utility
application and set the
DecoTech main folder used as
SOURCE text box
with that DecoTech ghost
folder path.
A typical DecoTech ghost
folder path should look like
"C:\Users\<Username>\AppData\Local\VirtualStore\Program
Files\DecoTech\" where the <Username>
represents a user log name.
Let's say that two
persons, Paul and Jane, have
used a DecoTech version 6.08
(or lower) on your Windows 7
(or Vista) and have saved
some files those need to be
moved to the good DecoTech
main folder located in
"C:\DDS Inc\DecoTech\".
1- Go to the
"C:\DDS Inc\DecoTech\bin\"
folder and double click on
the "dtmerger.exe"
application.
2- Normally the
DecoTech main folder used as
DESTINATION text
box should already contain "C:\DDS Inc\DecoTech"
since it is where we just
installed the DecoTech
version 6.11.
3- Click on the top most
Browse button to
specify a new location for
the source folder.
4- Locate and select
the
"C:\Users\Paul\AppData\Local\VirtualStore\Program
Files\DecoTech\" folder then select the
OK button.
5- Click on the "Start
the merging..."
button.
6- Read any warning window
that may pop and select the
appropriated action to
continue.
7- Once the merging is done
and successful, click again
on the top most
Browse button to
specify a new location for
the source folder.
8- Locate and select the "C:\Users\Jane\AppData\Local\VirtualStore\Program
Files\DecoTech\" folder then select the
OK button.
9- Click on the "Start
the merging..."
button.
10- Once the merging is done
and successful, you can
select the
Quit button.
Step 8 of 8 : Verifying that all your
files are back in the DecoTech
main folder
To
run a DecoTech application,
do not use
any shortcuts you created or
moved on the desktop or
somewhere else. Those
ones are still pointing on
the old location of DecoTech
in the "C:\Program
Files\DecoTech\"
folder. The only good
shortcuts, those that have
been updated by the version
6.11 installation
application, are in your
Start -> All Programs ->
DecoTech menu.
1- Run the
Scene Editor
application by using its
shortcut (or double-click
directly on the application
file located at
"C:\DDS Inc\DecoTech\bin\dt_se.exe").
2- Verify that all your
existing customized scene
projects are there.
3- Load some of your
existing projects and
generate the 3D perspective
for each of them. That
is a good test since to make
the 3D, the external pattern
and cabinet files associated
with the current project are
loaded.
4- Verify that all your
existing customized cabinet
files, group-object files,
pattern files and adding
preferences files are there
too.
Optional step 1 of 2 : Let's
start the clean up
Once you are sure that all your files are now present in the "C:\DDS Inc\DecoTech\"
folder, you can start
cleaning your computer.
1- You can delete the
"C:\Program Files\DecoTech\"
folder.
2- You can delete each "C:\Users\<Username>\AppData\Local\VirtualStore\Program
Files\DecoTech\" folders.
3- If you had some DecoTech
shortcuts on your desktop or
somewhere else, you can
replace them with the
corrected ones from the
Start -> All Programs ->
DecoTech menu.
4- You can delete the
downloaded file "dd611_master_cd-rom.exe"
or "dp611_master_cd-rom.exe".
5- You can burn you a
DecoTech Designer or
DecoTech Pro version 6.11
CD-Rom with the contents of
the "C:\DD
Master CD-Rom\" or "C:\DP
Master CD-Rom\" folder.
Click here for more explanations.
6- Once you have burned your
new version 6.11 CD-Rom, you
can delete the "C:\DD
Master CD-Rom\" or
"C:\DP
Master CD-Rom\"
folder.
Optional step 2 of 2 : A backup? Good idea!
After all this misadventure
and all this wasted time, making a
backup copy of your new
fixed, merged and
cleaned DecoTech main folder
should not be a so bad idea.
At the bottom of the
Topic #16 in the
Tips Spot sub-section
you can find a good example
of the use you can make of
the
DecoTech Main Folders Merger
Utility
application to perform a
backup copy of your precious
DecoTech data files.
